Overview
This tutorial covers STM32CubeIDE Build Scripts for automating and optimizing your STM32 development workflow. Build scripts can be configured to run at PRE and POST build steps, allowing you to add or remove lines of code before compilation begins — particularly useful after an IOC file update when saving the project. Scripts can be written in Perl, Python, Bash, or PowerShell. This tutorial focuses on Bash, taking advantage of Unix/Linux tools such as sed and awk to automate repetitive coding tasks and keep your STM32 project build process clean and efficient.
What You Will Learn
- How to configure pre-build and post-build scripts in STM32CubeIDE
- How to automate repetitive code modifications using bash scripts
- How to structure reusable master build scripts across projects
- How to leverage build variables and logs for automation decisions
Prerequisites
This tutorial assumes familiarity with STM32CubeIDE, basic shell scripting, and embedded C development workflows.
Materials List
- STM32CubeIDE
- Bash (or alternative scripting environment)
- Basic Linux/Unix command-line tools (sed, awk, grep)
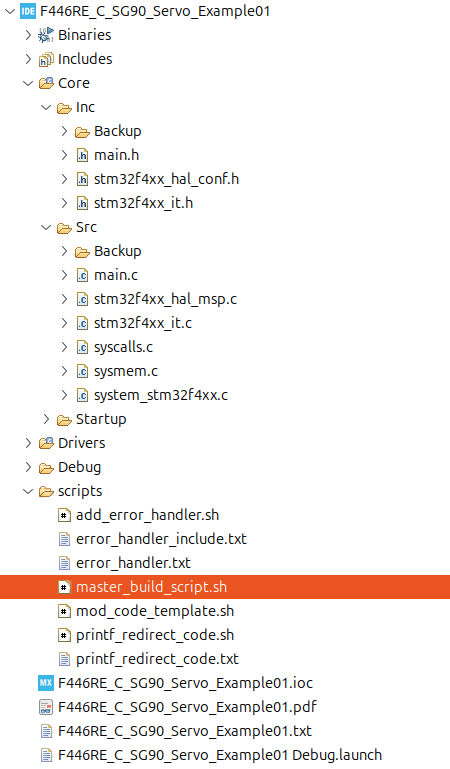
Project Structure
Hardware Configuration / Pinouts
Overview
This tutorial is software-focused and does not require any specific hardware setup.
Project Setup
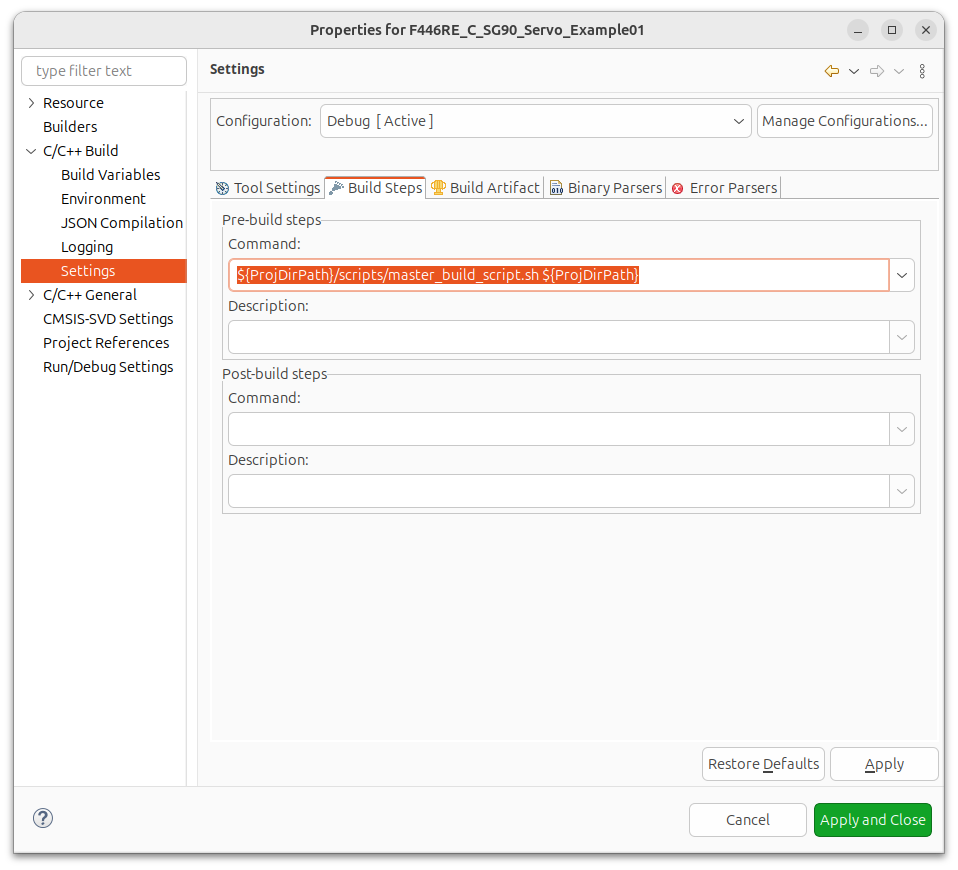
First we need to add a line: Under Project->Properties->C/C++ Build->Settings, there should be a tab called: “Build Steps”. In that field add the following:
${ProjDirPath}/scripts/master_build_script.sh ${ProjDirPath}The above example is the Linux path format, if using Windows, use the appropriate path symbols, instead of the Linux “/”.
What this does it tell the IDE that before we actually attempt to compile this project, we should look in the “ProjDirPath” for a folder called “scripts” and for a file called: “master_build_script.sh” then
pass in to this script a variable called: “ProjDirPath”, which is the location on the hard drive that contains the folder path to your project. This is helpful, because the scripts themselves need to know where the source code is to be able to modify the files.
Creating a master build script for each project and then adding pertinent scripts to perform work based on individual the project needs. Creating individual scripts that target a specific purpose is smart, as this leads to individual script re-use, which saves time.
So, you can have Project1’s master_build_script.sh include these example scripts:
!/bin/sh
cd $1  # This is the ProjDirPath parameter passed in, which sets the baseline as to where the script is executing the code.
./scripts/scriptA.sh
./scripts/scriptB.sh
./scripts/scriptC.shYou can as an example have Project2’s master_build_script.sh include these example scripts:
!/bin/sh
cd $1  # This is the ProjDirPath parameter passed in, which sets the baseline as to where the script is executing the code.
./scripts/scriptY.sh
./scripts/scriptA.sh
./scripts/scriptZ.sh
./scripts/scriptC.shCode Walkthrough
In this example script, we are wanting to add some code that will redirect output from STDOUT, to a USART device that has been assigned huart2 via the IDE configuration tool and the IOC file.
This first part of the script determines if the new code has already been added by searching for a string of characters “define REDIRECT_PRINTF” if this string is found then we assume that the modifications have already taken place and nothing is needed, so we exit. Otherwise, we find “USER CODE BEGIN Private defines” and append the string ‘define REDIRECT_PRINTF’ main.h
The next step is to look in main.c and locate “ifdef REDIRECT_PRINTF”, if this string is NOT FOUND then, the script will locate “USER CODE BEGIN 0” and then execute the following code:
sed -i ‘/USER CODE BEGIN 0/r ../../scripts/printf_redirect_code.txt’ main.c, which will find the string “USER CODE BEGIN 0” and replace it will the contents of the file : ../../scripts/printf_redirect_code.txt
If the script finds “REDIRECT_PRINTF” is already present in main.h then only an informational message to the console is displayed, and nothing is modified!
#!/bin/sh

cd $1/Core/Inc

redirect=`cat main.h | grep "define REDIRECT_PRINTF" | grep -v grep`

if [ -n "$redirect" ]	# -n returns True if the string length is non-zero
then
	echo "#define REDIRECT_PRINTF already present in main.h"
else
	echo "Adding #define REDIRECT_PRINTF to main.h"

	sed -i '/USER CODE BEGIN Private defines/a #define REDIRECT_PRINTF' main.h
fi

cd $1/Core/Src

printf=`cat main.c | grep "ifdef REDIRECT_PRINTF" | grep -v grep`

if [ -n "$printf" ]		# -n returns True if the string length is non-zero
then
	echo "REDIRECT_PRINTF code already implemented"
else
	echo "Adding REDIRECT_PRINTF code"

	sed -i '/USER CODE BEGIN 0/r ../../scripts/printf_redirect_code.txt' main.c
fiBelow is the text file for: ./scripts/printf_redirect_code.txt which contains the follow. This code is actually a text file template which will be used by the script. The below text will be insert into the source file main.h
#ifdef REDIRECT_PRINTF
#define PUTCHAR_PROTOTYPE int __io_putchar(int ch)
#endif

#ifdef REDIRECT_PRINTF
/**
  * @brief  Retargets the C library printf function to the USART.
  * @param  None
  * @retval None
  */
PUTCHAR_PROTOTYPE
{
  HAL_UART_Transmit(&huart2, (uint8_t *)&ch, 1, 0xFFFF);

  return ch;
}
#endif
There are many uses that can be implemented where there is a need to keep code in place that would normally be wiped out after a configuration change, that regenerates code. You can also use this to set parameters or #defines for specific reasons based upon other changes in the code. This is a much better methodology than constantly re-adding code that gets wiped out, as this is a repeatable process. Doing manual code updates every time generated code is erased and regenerated, can cause human errors with code being wiped out or forgotten to be re-added.
On the same “Build Steps” tab there is a section to have a script execute after the build is completed. This does not mean just when there is a successful build, but even if there are errors.
The post build script could test if the build was without errors, and if a successful build is achieved, you could perform some other task. An example task, might be to perform a “git commit”, or cause another build to occur.
STm32CubeIDE is built off of Eclipse a Java based IDE capable of running on any platform that can run Java.
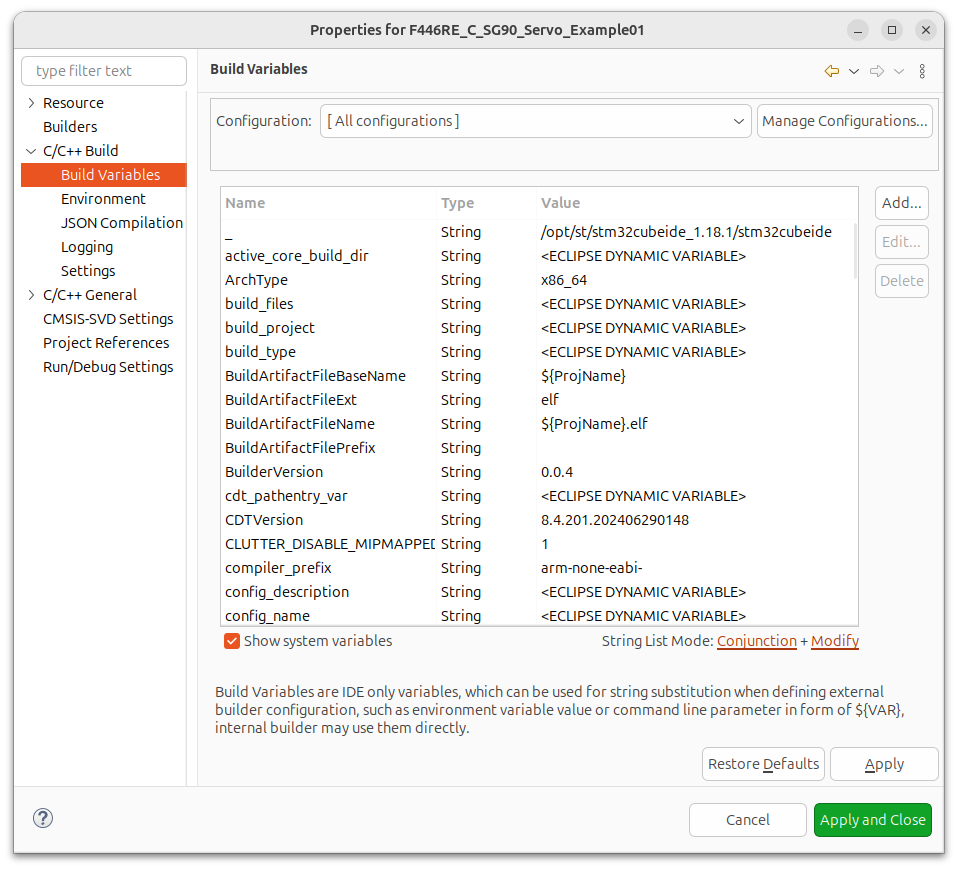
If you go to Project->Properties->C/C++ Build->Build Variables You will see a checkbox towards the bottom of the pop-up windows called “Show system variables” Select this and in the pop-up will now display every available Build Parameter/Variable that can be used with your scripts.
The location of the build log is NOT located in the project folder itself, but the IDE stores this file in the following folder: ~/MyWorkSpaceLocation/.metadata/.plugins/org.eclipse.cdt.ui
If your build is successful without errors, the you should see a line at the end of the log that looks similar to this:
18:06:20 Build Finished. 0 errors, 0 warnings. (took 5s.355ms)
You can then use the “0 errors” text as a flag or indicator to perform a task.
If you have questions or run into trouble getting the boards programmed and talking to each other, post in the Tutorial Support forum and I will work through it with you. If project source is not linked in the tutorial, it may be available on request — use the email contact option in the site footer.